I often see people wondering what software to use in post-production for their pictures. There’s no simple answer to this question, but I’ll introduce you the softwares I use in my workflow. Since I’m on Linux, I only work with the following open-source softwares: Darktable, Luminance HDR and Gimp.
In the first place, you may wonder why I work with free open-source softwares. There are two reason for this: first of all, I like the philosophy behind open-source. I like the idea that everyone can have easily access to the tool they need to work and that you’re not bound to a company. The tools are there, use them as you want. The second reason, which is linked to the first one, is a financial reason. Take a look at the price of Photoshop, Lightroom and Photomatix and you’ll have a good idea of how much money you’ll need before being able to work on your pictures. I know there are other less expensive softwares, but I’ll just talk about those that are the most known. And don’t think you’ll just have to buy those just once, they’ll always find some way to make you buy the new version of their softwares. So why spend your money on these when you can work with free softwares that are as good as those proprietary softwares ? Wouldn’t you like to spend this money on photographic equipment instead ? Some people may argue that Photoshop is better than Gimp, but having worked with Photoshop in the past as a graphic designer, I can assure you that there’s little you can do with Photoshop that you can’t with Gimp. Just a note: while these softwares are free this shouldn’t prevent you to make small donation from time to time to help the developpers work on them !
Alright, enough blah-blah about this, here’s a small introduction to the softwares I use in my post-production workflow:
1- Darktable:
![]() Darktable is the open-source equivalent to Lightroom. It is dedicated to photography, this is not a software which you’ll use to make some fancy effects. It is a Raw developper and this is the main software I use to work on my pictures. This is where I open my Raw files. I apply all the corrections I feel are needed to get the pictures that I want, such as: correcting exposure, increasing the sharpness, cropping, correcting lenses deformations and other little tasks. This is also the place where I preselect the pictures I want to work on.
Darktable is the open-source equivalent to Lightroom. It is dedicated to photography, this is not a software which you’ll use to make some fancy effects. It is a Raw developper and this is the main software I use to work on my pictures. This is where I open my Raw files. I apply all the corrections I feel are needed to get the pictures that I want, such as: correcting exposure, increasing the sharpness, cropping, correcting lenses deformations and other little tasks. This is also the place where I preselect the pictures I want to work on.
It is composed of two interfaces: the light table, on which you can see all the pictures from the folder you’ve imported with different information about each pictures such as the EXIF data and the corrections you’ve applied to the pictures. The second interface is the dark room, it is where you correct a specific image. You can save a lot of time by creating predefined styles that you can apply to a selection of pictures. This is the first thing I do after importing a folder. I’ve made a predefined style with some correction that I always apply to all my pictures, such as increasing sharpness and removing hot pixels. I then make my selection of pictures I think are worth to edit by applying color codes. And finally, I edit each picture individually and export them.
I really like this software, the developpers of it are very active and there are often updates to it. I’ve seen a lot of improvements since I use it and I’m sure I can expect a lot more in the future.
Darktable’s official website: http://www.darktable.org


2- Luminance HDR:
![]() Obviously, I only this software when I want to create HDR pictures, mostly for my urbex pictures. For those who don’t know what HDR is, it’s a way to combine multiple exposures of the same picture to get a better exposed picture, meaning you’ve got details both in shadows and in highlights. You can read about this technique on Wikipedia for more information. As I said, I use it only for my urbex pictures as I always take them in natural light and the lighting conditions are often difficult in those abandoned places.
Obviously, I only this software when I want to create HDR pictures, mostly for my urbex pictures. For those who don’t know what HDR is, it’s a way to combine multiple exposures of the same picture to get a better exposed picture, meaning you’ve got details both in shadows and in highlights. You can read about this technique on Wikipedia for more information. As I said, I use it only for my urbex pictures as I always take them in natural light and the lighting conditions are often difficult in those abandoned places.
Working with Luminance HDR can be a bit tricky at first, and I had to do a lot of experiments with it before finding the settings that I wanted. Basically, here’s how it works: You import the same picture but with different exposures in the software, usually it will find by itself the exposure setting for each picture, but if it don’t or if you think it’s wrong, you can still enter them by yourself. Let the software align the pictures or align them by yourself (which is not an easy task), and let him process the picture. On the next and final step, you choose how you want to render the processed picture. There are several different algorythms, each one with its own settings. This is where you’ll need to experiment a lot with it.
Luminance HDR’s official website: http://qtpfsgui.sourceforge.net

3- Gimp
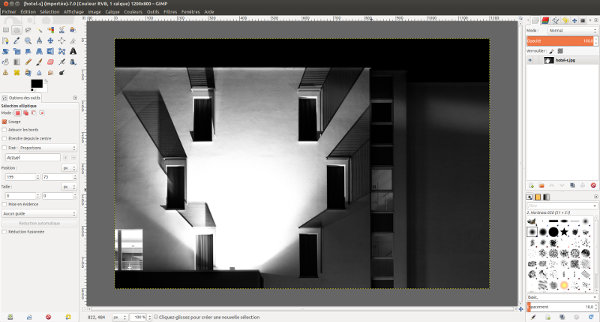
![]() Gimp is a photomanipulation software as well as Photoshop. I use it for some tasks that I cannot do in Darktable or that I’m feeling more comfortable to do in Gimp, for example. I also use it systematically with my HDR pictures to add them the little touch that I want, mostly bbecause my HDR often lacks of contrast. I’ve worked with Gimp for a lot of years now, and I can tell you that it’s avery good and reliable software. There are lots of evolutions in it, and it generally participate in the Google summer of code. Another great thing with Gimp is that it’s very popular, so you’ll find lots of tutorials about it online as well as books, but there are also a lot of extensions for it. You really should find exactly what you need !
Gimp is a photomanipulation software as well as Photoshop. I use it for some tasks that I cannot do in Darktable or that I’m feeling more comfortable to do in Gimp, for example. I also use it systematically with my HDR pictures to add them the little touch that I want, mostly bbecause my HDR often lacks of contrast. I’ve worked with Gimp for a lot of years now, and I can tell you that it’s avery good and reliable software. There are lots of evolutions in it, and it generally participate in the Google summer of code. Another great thing with Gimp is that it’s very popular, so you’ll find lots of tutorials about it online as well as books, but there are also a lot of extensions for it. You really should find exactly what you need !
Gimp’s official website: http://www.gimp.org
I hope this little article will help some of you in their choice of photography post-production software, and that it will at least help those great pieces of software to be better known, because they really deserve it !